This winter was very warm. I have a feeling that the summer is going to be record breaking as well. A bit of gardening and a resolution to spend some time outdoors left me with a desire for some decent looking shorts. I like the high-waisted vintage styles which are hard to find at the local mall. They are around some of the small boutiques in the city and online, but, with prices around $50, these are not an option for me. My budget is somewhere around the Walmart price range.
This is how I made myself a nice pair of old fashioned cutoffs with a cute torn heart detail. The first section of the tutorial shows how to take awkward little boys (men's) jeans and make them into something more feminine. The second part focuses on the ripped heart on the back pocket.
Part A - Thriftypants
For my foundation pants I went looking for something with a classic fit and feel - high waisted, all cotton, no stretch. This isn't everyone's style, but it is actually the secret to finding dirt cheap denim. The cheapest pants are mom jeans and dad jeans and they both have the desired high rise. Walmart does not carry any size below a 4, so I do not fit so well into their ladies pants. Women's styles also tend to have stretch fibers which can look funny when you have a raw edge.
The ultimate pant for a classic look is a plain old men's work jean without cargo or boot cut elements. Men's sizing is done by waist size, so they will be easy to find. a 28 is equivalent roughly to a women's 6. For smaller sizes, move down to the boy's section.
These are the Wrangler Classic Fit boys size 16 jeans that I bought for $14 at Walmart. Finding the right pants to fit a womanly shape takes some trips to the fitting room, but pays off in the final silhouette. My parents say that in the '60s there were jeans in one shape and color, the bell bottoms came towards the end of the decade. My mother in particular gave me a lot of advice on how to break in this basic denim based on her experiences.
Now that you have hopefully found your pants, lay them out on a flat surface.
You will need: Scissors, chalk, a pair of shorts that you like.
Optional: A sewing machine, bleach or dye.
Take a pair of shorts that you like and match the crotches. If you match the waist they may not turn out right.
You can also find your hemline by trying on the pants.
Mark with chalk or a pencil the desired length of the shorts based on the overlaid shorts.
Copying some of the festival trends, I decided to go short, slightly angled up, and shorter in front than back by 1.5".
Cut 1" below your hemline mark. This allowance accounts for the amount of fringe that will happen in the first few washings.
Your shorts are now ready to try on. There may be some height adjustments to make. I was conservative with my first cuts and ended up taking off a bit after a fitting.
If you are concerned about excessive fraying, you can sew along your hemline mark with a simple stitch. Keep in mind that without this step, your shorts will get shorter with time.
Before finishing these off with a wash, I put them into some water with a half cup of bleach to lighten the color. It took a long time to get the light color, but going slow keeps things consistent and controllable. The bleach softens the fibers and will make fuzzier fringe after washing.
Part B - Heartypants
After a few washes and wearings, the fringe will develop and you will start to break in your new shorts.
Very simple. Mark, cut, sew, wear.
But I wanted a little embellishment, something not too harsh like studs or crazy colors. I decided on a little pocket detail a la Moschino.
You will need: A pencil, Fray Check or clear nailpolish, a stitch ripper or some sort of delicate cutting tool.
To make the cutout shape, draw on outline on the fabric. You can do this anywhere on any denim fabric. I chose to put this on the pocket to avoid holes that let my undies shine through.
Reinforce the fibers on the outside of the outline with Fray Check or clear nailpolish. Washing and wear will distort and rip your shape if you do not fix the edge.
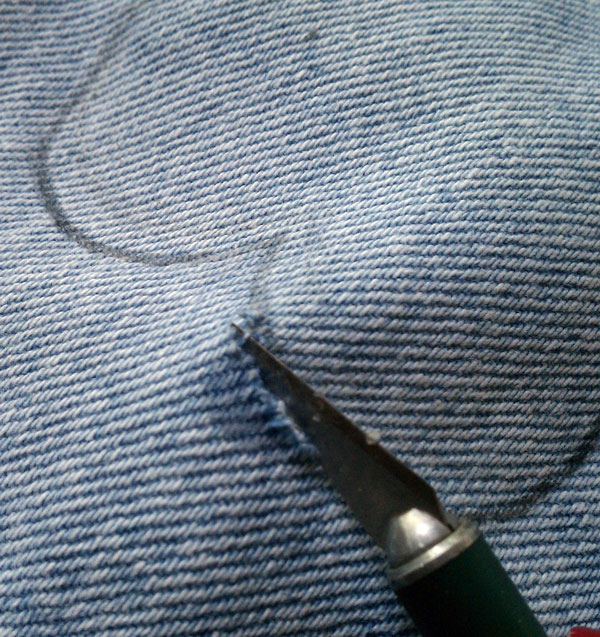
If you have a stitch ripper you'll want to use it to cut the individual threads around your shape. I lost mine and made do with an X-ACTO to cut. You want to sever all of the vertical threads but leave the horizontal threads intact. Usually the horizontal threads are white and easy to differentiate from the blue fibers which are more visible on the right side of the garment.
After cutting all the way around your shape, the fibers on the inside can be pulled out to reveal the white strands. It does take a bit of time, but really adds a personal touch. After washing the strands will plump up. I still have not washed mine and may put a bit more Fray Check on to really preserve the cute heart shape for sure.
Part C - Wearyourpants
It looks like time to run around in the grass with your heartypants.
In spite of my expression in the pictures, I am really happy with my new shorts. It is a pretty big improvement from the original. They have a lot of the classic shape that I wanted and are bound to get better with age.
Now run from the stingy bees.


