Friday, June 22, 2012

perfect polishes part 1


Everyone seems to be obsessed with nail polish right now. Though it is great that you can find any color of the rainbow in the cosmetics aisle, getting every color that you want is pretty expensive - especially when precious metals are involved.

This is an easy recipe for gold flake polish which uses actual gold bits. The texture is more organic in shape, size, and distribution because the metal is irregularly cut by hand.

You will need:

A bottle of clear nail polish
3 sheets of real gold leaf (per .5 oz)
 a sheet of printer paper
scissors
a funnel


You can find gold leaf in most art supply or craft stores. There are also less expensive metals available, but they may oxidize over time and alter the color and consistency of the clear base polish. Think of what happens to the color of your finger when you wear a cheap ring.


Put a piece of printer paper on your work surface and lay out a sheet of the gold leaf.


Gently fold the sheet of gold leaf into a roll and chiffonade (cut into strips) the metal with a pair of sharp scissors. If you have trouble with the gold sticking to your fingers, wash and dry your hands or wear a pair of cloth gloves.


Snip the ribbons of gold leaf into little flakes keeping everything contained within the borders of the printer paper. The flakes should be smaller than a half nail before they are proper glitter,

Place your funnel on top of your nail polish bottle. Mine was able to balance/stick on top of the polish bottle. Pick up the printer paper and fold it in  half, gathering the gold into a stream in the center. pour the flakes into the funnel. Some of them may not go down, you can use a toothpick to help push everything in. 

Ready to use plain or layered.


Wednesday, June 6, 2012

Lovely Lawn

I just have to say that grass lawns are so boring.  

My father has always made sure that, along with grass, our lawn has wild flowers, wild strawberries, chives, and moss naturally growing in patches.

 It's pretty.


More people should let their lawns go wild.


Sunday, June 3, 2012

Midnight Curry

I am not a big fan of daylight, you may notice that usually my posts go up around 3-4 AM. It can make eating kind of tricky because I'm not usually awake during grocery store hours. Left in the middle of the night with limited ingredients, an excess of frozen IKEA meatballs, and a coconut craving, some strange things happen.


To make IKEA Coconut Curry you will need:
2 cubes or packets of Japanese style curry
 300ml water OR the amount of water in the box's instructions
1/3 cup of Baker's sweetened Angel Flake coconut
12 frozen IKEA meatballs
Rice

Start by heating the meatballs according to the instructions on the package (4 min in the microwave).

Combine the water, coconut, and curry cubes in a pot over high-medium heat.

While the curry mix is coming to a boil, quarter the meatballs. For maximum fun, use scissors.

When the sauce starts to thicken, add the meatballs.

Serve over rice garnished with some shredded coconut, flavor improves with some fridge time. This will make about 4 servings.


There are no pictures of the cooking process because it was dark when I made it, but this is my leftovers lunch. I'm not a huge fan of the well-done, ground beef flavor of the meatballs unseasoned and so letting the flavors blend overnight and mellow a bit made this recipe a lot better. Adding coconut to basic curry makes it sweeter and less like the usual cheap boxed curry.

If you are daring, bored, or ever wondered what the food tastes like on the show CHOPPED, you might want to try this out.

Tuesday, May 29, 2012

♥ shorts ♥

 
This winter was very warm. I have a feeling that the summer is going to be record breaking as well. A bit of gardening and a resolution to spend some time outdoors left me with a desire for some decent looking shorts. I like the high-waisted vintage styles which are hard to find at the local mall. They are around some of the small boutiques in the city and online, but, with prices around $50, these are not an option for me. My budget is somewhere around the Walmart price range.

This is how I made myself a nice pair of old fashioned cutoffs with a cute torn heart detail. The first section of the tutorial shows how to take awkward little boys (men's) jeans and make them into something more feminine. The second part focuses on the ripped heart on the back pocket.


Part A - Thriftypants

For my foundation pants I went looking for something with a classic fit and feel - high waisted, all cotton, no stretch. This isn't everyone's style, but it is actually the secret to finding dirt cheap denim. The cheapest pants are mom jeans and dad jeans and they both have the desired high rise. Walmart does not carry any size below a 4, so I do not fit so well into their ladies pants. Women's styles also tend to have stretch fibers which can look funny when you have a raw edge.

The ultimate pant for a classic look is a plain old men's work jean without cargo or boot cut elements. Men's sizing is done by waist size, so they will be easy to find. a 28 is equivalent roughly to a women's 6. For smaller sizes, move down to the boy's section.


These are the Wrangler Classic Fit boys size 16 jeans that I bought for $14 at Walmart. Finding the right pants to fit a womanly shape takes some trips to the fitting room, but pays off in the final silhouette. My parents say that in the '60s there were jeans in one shape and color, the bell bottoms came towards the end of the decade. My mother in particular gave me a lot of advice on how to break in this basic denim based on her experiences.


Now that you have hopefully found your pants, lay them out on a flat surface.

You will need: Scissors, chalk, a pair of shorts that you like.

Optional: A sewing machine, bleach or dye.


Take a pair of shorts that you like and match the crotches. If you match the waist they may not turn out right.
You can also find your hemline by trying on the pants.


Mark with chalk or a pencil the desired length of the shorts based on the overlaid shorts. 
Copying some of the festival trends, I decided to go short, slightly angled up, and shorter in front than back by 1.5".


Cut 1" below your hemline mark. This allowance accounts for the amount of fringe that will happen in the first few washings.


Your shorts are now ready to try on. There may be some height adjustments to make. I was conservative with my first cuts and ended up taking off a bit after a fitting.


If you are concerned about excessive fraying, you can sew along your hemline mark with a simple stitch. Keep in mind that without this step, your shorts will get shorter with time.


Before finishing these off with a wash, I put them into some water with a half cup of bleach to lighten the color. It took a long time to get the light color, but going slow keeps things consistent and controllable. The bleach softens the fibers and will make fuzzier fringe after washing.


Part B - Heartypants

After a few washes and wearings, the fringe will develop and you will start to break in your new shorts.

Very simple. Mark, cut, sew, wear.

But I wanted a little embellishment, something not too harsh like studs or crazy colors. I decided on a little pocket detail a la Moschino.

You will need: A pencil, Fray Check or clear nailpolish, a stitch ripper or some sort of delicate cutting tool.


To make the cutout shape, draw on outline on the fabric. You can do this anywhere on any denim fabric. I chose to put this on the pocket to avoid holes that let my undies shine through.


Reinforce the fibers on the outside of the outline with Fray Check or clear nailpolish. Washing and wear will distort and rip your shape if you do not fix the edge.


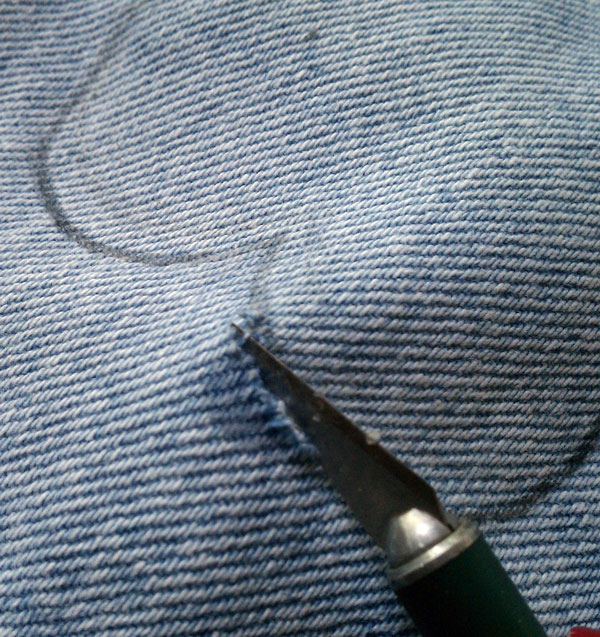
If you have a stitch ripper you'll want to use it to cut the individual threads around your shape. I lost mine and made do with an X-ACTO to cut. You want to sever all of the vertical threads but leave the horizontal threads intact. Usually the horizontal threads are white and easy to differentiate from the blue fibers which are more visible on the right side of the garment.


After cutting all the way around your shape, the fibers on the inside can be pulled out to reveal the white strands. It does take a bit of time, but really adds a personal touch. After washing the strands will plump up. I still have not washed mine and may put a bit more Fray Check on to really preserve the cute heart shape for sure.


Part C - Wearyourpants

  
 It looks like time to run around in the grass with your heartypants. 


In spite of my expression in the pictures, I am really happy with my new shorts. It is a pretty big improvement from the original. They have a lot of the classic shape that I wanted and are bound to get better with age.

Now run from the stingy bees.


Monday, May 14, 2012

IKEA

Going to IKEA is almost like going on a day long vacation.


This was lunch. The selection of non offensive American classics, Swedish dishes, and pretty pastries is a really good way of explaining what is good about IKEA. On top of a sturdy foundation of organization, coordination, and presentation, they have options. There are certain things that could be considered IKEA classics, Poang bent ply chairs, mod fabrics, and those famous meatballs. If you are into the brand, this is what you want. Then there is furniture which fits the average home. It is less minimal with more upholstery foam, floral prints, and moldings. These are like ordering a mac and cheese combo in the cafeteria. Each section also has a sprinkling of more expensive items with slightly better quality or craftsmanship. You can splurge on cow skin rugs and leather sofas if you really want. These are like those indulgent desserts but for your home.

Most people can find something they like because of these basic themes.

The IKEA in New Haven is particularly pleasant from a design perspective because the dining room looks out to the historically significant Pirelli Tire building.

Designed in 1968 by Marcel Breuer, this vacant building was supposed to be demolished to make room for the IKEA. Though the majority of the structure was torn down, the most interesting section was left standing. The masterful use of texture in the concrete cannot be seen in this picture, but the building is actually worth visiting to get the details.

Though I wasn't looking for furniture on this trip, I was looking at it. I made special note of the way textured accessories were used to add personality and interest to the constructed interiors.
 These were some of the reference pictures that I snapped to use as texture inspiration.

I also found a new friend to take home with me in the children's department.
This is my new vegetable friend. He is a carrot with shorts.

I'm pretty analytical about how I choose stuffed toys, and our friendship is a result of an outstanding hug test. I actually tried explaining to some strangers that as part of my college education, I learned a lot about what makes a good stuffed toy. Each toy can be critiqued on form, character, and educational value. I think they thought that I was either making things up or mentally unsound. Anyway, this carrot in shorts came home with me. I like him a lot.

If you ever need a good vacation spot, check out IKEA.

You might also like...