Showing posts with label craft. Show all posts

Sunday, November 27, 2016

Make an extra floofy i-cord pom-pom


This fun loopy pom-pom made from an i-cord is a unique topper for any hat. Instructions are for small 2.25" (5.75 cm) and large 3.25" (8.25 cm) size pom-poms.

The Flower Petal Hat pattern shown above featuring an i-cord puff is available via ravelry or as a kit from MollyGirl Yarn, but in the spirit of the holiday season, I've made a free tutorial for the i- cord pom-pom.

Friday, December 4, 2015

Gift Cowl Pattern

Winter is the season for gifts, and every year this is my go-to cowl for family and friends who are on my gift list. Worked in an airy lattice stitch, this cowl is still extra warm for winter because of the thickness of the recommended yarn.


A printer friendly version of this pattern is available as a free download on Ravelry, or you can continue online with the instructions below.

Thursday, June 18, 2015

Jersey Shore Knits

I'm proud to introduce my first collection of accessories, inspired by the Jersey shore. It contains 4 projects perfect for beach knitting. Each is inspired by a part of the Jersey Shore culture and setting and is knit in a yarn from a different New Jersey dyer. I'll be interviewing each of the dyers over the next few weeks to highlight their unique and individual approaches.

People have asked why I'm focused on New Jersey and I have a very simple answer: The Jersey shore is a beautiful American treasure, filled with unique small businesses. In recent years, press from shows like Jersey Shore have colored people's perception of what it's like to vacation in New Jersey, but there's so much more to the shore than partying and wearing flashy clothing.

My Jersey shore experiences are all about the fun, food, and a beautiful setting.

I've been traveling to the shore often thanks to my aunt and uncle, owners of the Northwood Inn in Ocean City NJ. It is a treat to stay in one of the best B&Bs on the island. The Queen Anne style Victorian, was built circa 1894 and was restored inside and out by John Loeper. It has a porch that's made for sitting and knitting.

It would be a crime not to mention Marj's breakfasts. She's known for her orange chocolate chip muffins, but personally I am a fan of the lime nut muffins and the coconut bread. Marj will be sharing some of her recipes in the next few weeks. 

One of the unique and interesting attributes of the shore is the variety of colorfully painted victorian houses, known as "painted ladies." The Northwood has a palette of wheat, salmon and sage - beautiful, but calm in comparison to some other houses. Cape May, only 30 minutes from Ocean City is known for an abundance of beautiful Victorian houses. These lacy motifs and and historical colors inspired the Seashell Shawl. 


You can see how the intricately painted houses influenced the colors and detailing in this shawl. The yarn from Woolbearers in Mount Holly, NJ is a traditional colorwork yarn hand dyed in semisolid colors. 

When you stay in one of these nice houses, you can smell the ocean air coming in with the tides. On the beach, there are surfers, swimmers and sunbathers, but the beauty of the ocean is in the way the waves break at the shoreline. As they come in, they split into a bunch of smaller ripples, creating an interesting texture in the water. 

The Atlantic Ocean Cowl is inspired by the way these waves break on the sand. 


In between the ocean and the land there's the boardwalk. It's the center of the entertainment day and night with all the snacks, amusement parks, and arcades.

In 2012, hurricane Sandy decimated businesses along the coast. The boardwalk in many towns was hit hard. But in spite of the devastation, many people have worked hard to rebuild. On my most recent trip, reminders of the storm were almost unnoticeable and are mostly visible in placed where the planks on the boardwalk were replaced with new wood. 

You can see the repairs in this early morning photo taken before the shops open for the day and the crowds arrive.

The Boardwalk Wrap knit in Spark Story Toughie Sock is an openwork mesh perfect to wear on a warm day. The geometry in the lattice knit motif reminds me of the way the planks of the boardwalk make interesting patterns. It is hard to convey in a photograph just how nice this fabric feels to wear.

So what kind of businesses are along the boardwalk? Mostly surf shops and junk food, I cannot resist sharing a few images of food eaten during the Jersey Shore Knits shoot:

There was more, But I'll stop and tell you about another big part of what's on the boardwalk. Amusement parks are one of the biggest draws to the Jersey shore. These small family run establishments have none of the outrageous lines  and gimmicky feel of big parks, in fact many have historic carousels and an old time feel. They also almost always have a huge ferris wheel, acting as a beacon to guide arriving tourists towards the beach.

We were lucky enough to plan the photo shoot so that the annual opening of the parks was our last night there. It was a pleasure to see everyone out to celebrate and to photograph the Ferris Wheel Shawl, knit in MollyGirl yarn, right in front of those iconic lights.


You'll be hearing mor about these patterns, yarns, and locations over the next month, remember it's not too late to book a vacation to the shore, but if you 'd rather just knit your way there, check out the Jersey Shore Knits E-book on ravelry.

Thursday, September 11, 2014

Knit Tips: Weaving in ends as you knit

I love knitting stripes and using different colors in my knitting, but I HATE sewing in ends. To avoid all that extra finishing work, just these simple directions.

Sunday, August 17, 2014

☠ chromatose ☢


I got this yarn on impulse, thinking that maybe it would make a decent sweater. The idea of entirely unique skeins made from mill ends is really wonderful. I want to make a bunch of these just to group skeins into sweaters. I am looking into getting this yarn direct from the mill in Michigan to make some machine knit sweaters for retail!

Friday, December 13, 2013

Simple Gifts Scarf

It is gift season and if you are a knitter, you are probably looking for some easy , fast last minute ideas.


Consider this simple brioche stitch scarf.

Wednesday, November 6, 2013

Knit for work or play: Midnight Blazer

Last year, when working in a freezing office, I went looking around the internet for a  super warm work appropriate blazer. There wasn't a lot that left my forearms free to do computer work and fit my intern budget. I got the idea to knit something that looked work appropriate and chic yet a bit edgy with a bit of extra shoulder padding like a tailored blazer.
This silhouette is designed to flatter “pear shapes” by drawing the eye up and balancing a bottom heavy figure.


Working with Lamb's Pride Bulky (budget appropriate and a quick knit) I came up with this simple fitted cardigan with a modified set in sleeve. In 4 days of commute knitting and about $40 I had a great new piece to wear and established myself as "the intern who could fix your knitting."


My mom also made this and added long sleeves which are a great easy mod. she doesn't know I'm using her picture here, but she looks great, so I'm sneaking it up before she can object.


Also, Look at how nice her back neck looks.


Sizes - determined by bust measurement:

Bust Measurement (from body): XS(28-30”), S(32-34”), M(36-38”), L(40-42”), XL(44-46”)

Garment Bust: XS(15.5”), S(17.5”), M(19.5”), L(21.5”), XL(23.5”)
Garment Waist: XS(12.5”), S(13.75”), M(15.5”), L(17.5”), XL(19.5”)
Garment Hips: XS(17”), S(18”), M(20”), L(22”), XL(24”)
Garment Length: XS(22”), S(22.5”), M(22.75”), L(23”), XL(23.25”)


Grading, test knitting, tech editing, and illustrating the unique sleeve seams may have taken a year, but it is finally out and ready to purchase right here or view via ravelry so please take a look . 

Tuesday, August 13, 2013

Double Box, Tornado, and more Lanyards - Classic Camp Crafts

Once you master the box stitch, you may want to multiply it by adding more colors to make a bigger lanyard. The same thing also works for the barrel stitch.


You may remember from the cobra stitch tutorial that you will need  plain gimp ,  neon, glow, clear, double sided or tie dye, and you can get a better color selection  online .


I also used some deerskin lacing and 3mm curb chain this time.


Remember you can make these as wide as you want, though the below is not recommended...


And now here's how to add the twist:


You can see what it looks like with more strings.


And a little bonus at the end showing you how to make my favorite stitch, the super box, or box 2. It has a really nice feel to it even though it is made of the cheap plastic.


So take a look, and leave some comments if you have questions. The video thing is still new, so be nice.


I got started slow this summer on the camp crafts, but expect more  vidyos next year, and definitely let me know what you want to see or anything you remember from your camp days.

Wednesday, August 7, 2013

Box and Barrel Lanyards, Classic Camp Crafts

Now, this is the  real classic  lanyard knot, used by sailors to boyscouts.  One of the first things you learn to make as a camper, or at least one of the first things I learned with gimp: the box stitch. 

You may remember from the cobra stitch tutorial that you will need  plain gimp ,  neon, glow, clear, double sided or tie dye, and you can get a better color selection  online .


Still loving that neon paracord though. it is good for everything.


Saturday, August 3, 2013

Classic Camp Crafts - Lanyards: the Cobra Stitch

Did you go to camp? I did, and while I was there, I used to spend as much time on the Arts&Crafts shack as possible. We made all sorts of things that were very often useless and ugly, but we also got to do the cool stuff like tie dye, clay pottery, and friendship bracelets. 


Lanyards were not on the list of cool or useful things  that you could make, but they were my favorite.


I made these 2 videos for all the ex campers out there who want to get nostalgic. It's also a great way for parents of kids that do not go to camp to share in the fun.

Friday, June 22, 2012

perfect polishes part 1


Everyone seems to be obsessed with nail polish right now. Though it is great that you can find any color of the rainbow in the cosmetics aisle, getting every color that you want is pretty expensive - especially when precious metals are involved.

This is an easy recipe for gold flake polish which uses actual gold bits. The texture is more organic in shape, size, and distribution because the metal is irregularly cut by hand.

You will need:

A bottle of clear nail polish
3 sheets of real gold leaf (per .5 oz)
 a sheet of printer paper
scissors
a funnel


You can find gold leaf in most art supply or craft stores. There are also less expensive metals available, but they may oxidize over time and alter the color and consistency of the clear base polish. Think of what happens to the color of your finger when you wear a cheap ring.


Put a piece of printer paper on your work surface and lay out a sheet of the gold leaf.


Gently fold the sheet of gold leaf into a roll and chiffonade (cut into strips) the metal with a pair of sharp scissors. If you have trouble with the gold sticking to your fingers, wash and dry your hands or wear a pair of cloth gloves.


Snip the ribbons of gold leaf into little flakes keeping everything contained within the borders of the printer paper. The flakes should be smaller than a half nail before they are proper glitter,

Place your funnel on top of your nail polish bottle. Mine was able to balance/stick on top of the polish bottle. Pick up the printer paper and fold it in  half, gathering the gold into a stream in the center. pour the flakes into the funnel. Some of them may not go down, you can use a toothpick to help push everything in. 

Ready to use plain or layered.


Tuesday, May 29, 2012

♥ shorts ♥

 
This winter was very warm. I have a feeling that the summer is going to be record breaking as well. A bit of gardening and a resolution to spend some time outdoors left me with a desire for some decent looking shorts. I like the high-waisted vintage styles which are hard to find at the local mall. They are around some of the small boutiques in the city and online, but, with prices around $50, these are not an option for me. My budget is somewhere around the Walmart price range.

This is how I made myself a nice pair of old fashioned cutoffs with a cute torn heart detail. The first section of the tutorial shows how to take awkward little boys (men's) jeans and make them into something more feminine. The second part focuses on the ripped heart on the back pocket.


Part A - Thriftypants

For my foundation pants I went looking for something with a classic fit and feel - high waisted, all cotton, no stretch. This isn't everyone's style, but it is actually the secret to finding dirt cheap denim. The cheapest pants are mom jeans and dad jeans and they both have the desired high rise. Walmart does not carry any size below a 4, so I do not fit so well into their ladies pants. Women's styles also tend to have stretch fibers which can look funny when you have a raw edge.

The ultimate pant for a classic look is a plain old men's work jean without cargo or boot cut elements. Men's sizing is done by waist size, so they will be easy to find. a 28 is equivalent roughly to a women's 6. For smaller sizes, move down to the boy's section.


These are the Wrangler Classic Fit boys size 16 jeans that I bought for $14 at Walmart. Finding the right pants to fit a womanly shape takes some trips to the fitting room, but pays off in the final silhouette. My parents say that in the '60s there were jeans in one shape and color, the bell bottoms came towards the end of the decade. My mother in particular gave me a lot of advice on how to break in this basic denim based on her experiences.


Now that you have hopefully found your pants, lay them out on a flat surface.

You will need: Scissors, chalk, a pair of shorts that you like.

Optional: A sewing machine, bleach or dye.


Take a pair of shorts that you like and match the crotches. If you match the waist they may not turn out right.
You can also find your hemline by trying on the pants.


Mark with chalk or a pencil the desired length of the shorts based on the overlaid shorts. 
Copying some of the festival trends, I decided to go short, slightly angled up, and shorter in front than back by 1.5".


Cut 1" below your hemline mark. This allowance accounts for the amount of fringe that will happen in the first few washings.


Your shorts are now ready to try on. There may be some height adjustments to make. I was conservative with my first cuts and ended up taking off a bit after a fitting.


If you are concerned about excessive fraying, you can sew along your hemline mark with a simple stitch. Keep in mind that without this step, your shorts will get shorter with time.


Before finishing these off with a wash, I put them into some water with a half cup of bleach to lighten the color. It took a long time to get the light color, but going slow keeps things consistent and controllable. The bleach softens the fibers and will make fuzzier fringe after washing.


Part B - Heartypants

After a few washes and wearings, the fringe will develop and you will start to break in your new shorts.

Very simple. Mark, cut, sew, wear.

But I wanted a little embellishment, something not too harsh like studs or crazy colors. I decided on a little pocket detail a la Moschino.

You will need: A pencil, Fray Check or clear nailpolish, a stitch ripper or some sort of delicate cutting tool.


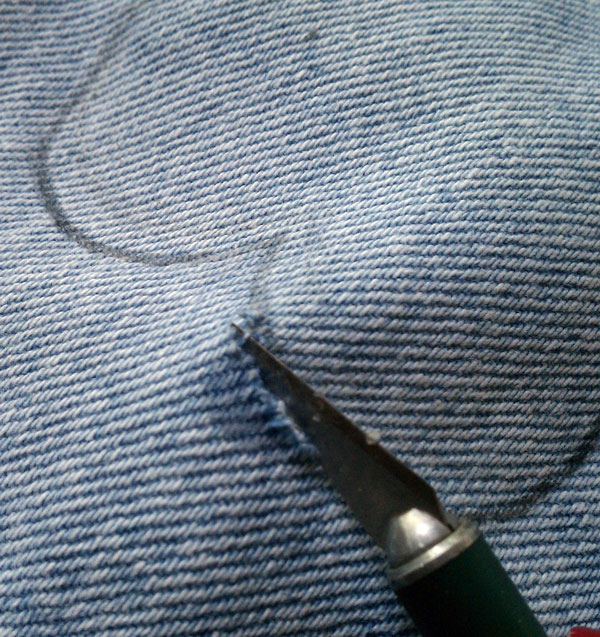
To make the cutout shape, draw on outline on the fabric. You can do this anywhere on any denim fabric. I chose to put this on the pocket to avoid holes that let my undies shine through.


Reinforce the fibers on the outside of the outline with Fray Check or clear nailpolish. Washing and wear will distort and rip your shape if you do not fix the edge.


If you have a stitch ripper you'll want to use it to cut the individual threads around your shape. I lost mine and made do with an X-ACTO to cut. You want to sever all of the vertical threads but leave the horizontal threads intact. Usually the horizontal threads are white and easy to differentiate from the blue fibers which are more visible on the right side of the garment.


After cutting all the way around your shape, the fibers on the inside can be pulled out to reveal the white strands. It does take a bit of time, but really adds a personal touch. After washing the strands will plump up. I still have not washed mine and may put a bit more Fray Check on to really preserve the cute heart shape for sure.


Part C - Wearyourpants

  
 It looks like time to run around in the grass with your heartypants. 


In spite of my expression in the pictures, I am really happy with my new shorts. It is a pretty big improvement from the original. They have a lot of the classic shape that I wanted and are bound to get better with age.

Now run from the stingy bees.


You might also like...